Smart home sensors for beginners can sound more technical than they really are. A sensor is simply a small device that notices one kind of change, such as motion, water, temperature, humidity, or whether a door is open. The useful part is not the gadget itself. The useful part is the calm little routine it can trigger.
For a beginner, the best sensor is usually the one that solves one real problem without adding five new notifications. A leak sensor under a sink, a door sensor on a pantry, or a motion sensor for a hallway light can be easier to understand than a whole-house automation plan.
This guide explains smart home sensors in plain English, with conservative setup habits and simple checks. WattCalm provides general smart-home and energy-habit information, not electrical, HVAC, or financial advice. Always follow product manuals and hire qualified professionals for wiring or system changes.
Why Smart Home Sensors for Beginners Matter
Sensors matter because they can turn a quiet change into a timely reminder. You may not notice a slow drip under the washing machine, a freezer door left slightly open, or a basement humidity trend until it becomes annoying. A sensor can give you an earlier signal so you can check the situation while it is still small.
Some sensors also connect to energy routines. ENERGY STAR explains that smart thermostats may use temperature and occupancy sensors to manage comfort and hot or cold spots, especially in larger homes: ENERGY STAR smart thermostat guidance.
That does not mean every room needs a device. The calmer approach is to choose one sensor for one routine, watch how it behaves for a week, and only expand if the result is genuinely useful.
Start With Sensors for a Calmer Home
Before comparing brands, it helps to know the common sensor types in normal language. Most homes only need a few categories at first.
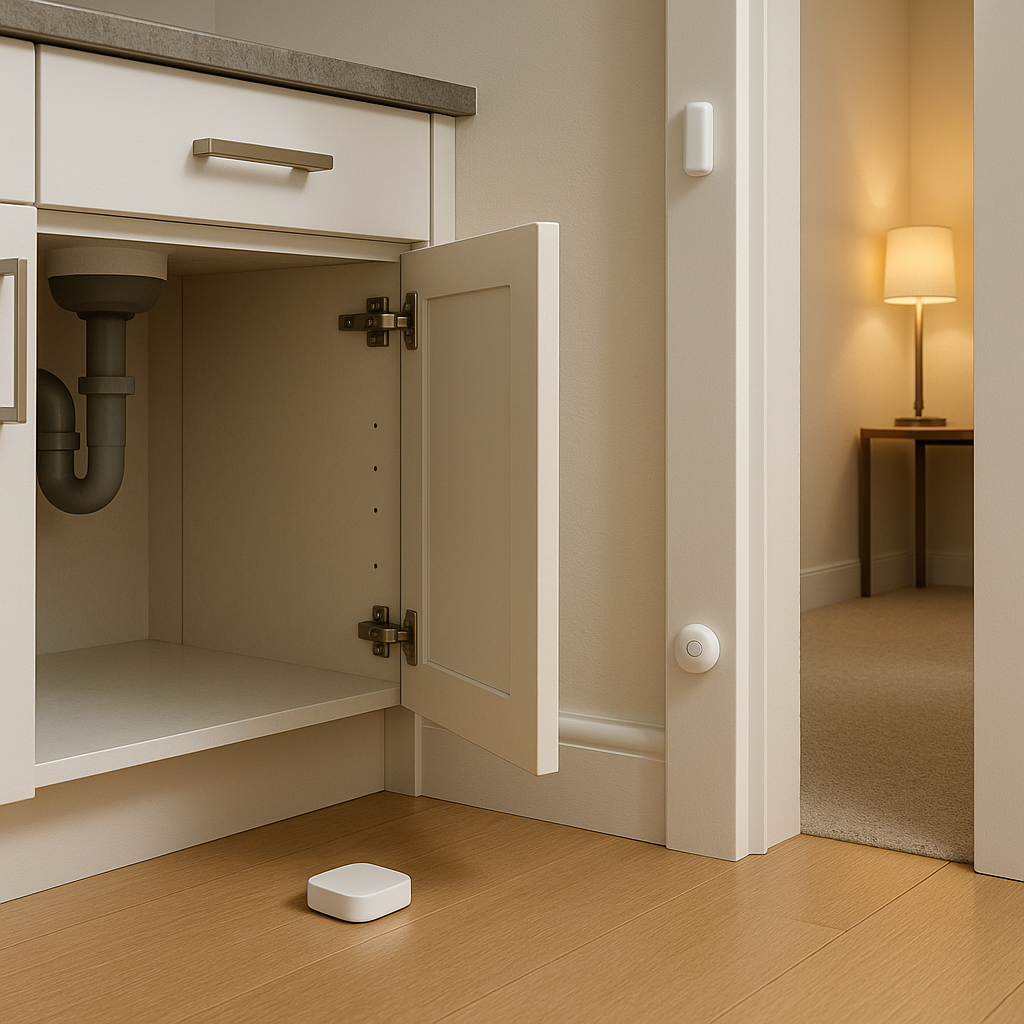
- Leak sensors: sit near water-risk areas and alert you if the contacts detect moisture.
- Door and window sensors: notice open or closed status, which can help with reminders, lights, or simple security awareness.
- Motion sensors: notice movement and can trigger lights or occupancy routines.
- Temperature sensors: monitor a room, basement, garage, nursery, freezer area, or thermostat zone.
- Humidity sensors: track moisture trends in bathrooms, basements, laundry spaces, or storage areas.
Choose a boring first use
The best first sensor use is usually boring in a good way. A leak sensor under the kitchen sink or a door sensor that reminds you when a garage entry stays open too long teaches the whole setup process without requiring complex automation.
Avoid notification overload
If a sensor alerts you every time someone walks through a busy room, you will probably ignore it. Put alerts only on events that deserve attention, such as water detected, a door left open for several minutes, or a temperature outside a sensible range.
What to Check First Before Buying
Smart home sensors for beginners should fit your actual home, not just the app ecosystem in an ad. Check four practical details before buying anything.
- Power source: some sensors use replaceable batteries, some recharge, and some plug in. Battery devices need a reminder routine.
- Connection type: Wi-Fi sensors may be simple but can use more battery. Zigbee, Z-Wave, Thread, or Matter devices may need a hub or compatible controller.
- Placement limits: product manuals may warn against outdoor use, high heat, direct water, metal surfaces, or poor Wi-Fi spots.
- Alert control: the app should let you adjust notification timing, quiet hours, and who receives alerts.
Electrical safety still matters around powered devices, cords, and outlets. The Electrical Safety Foundation International advises against overloading extension cords, using damaged cords, or substituting extension cords for permanent wiring: ESFI extension cord safety tips.
That source is not saying every sensor is dangerous. It is a reminder to keep smart-home projects inside product limits, especially if a sensor, hub, camera, siren, or plug-in accessory needs power.
How to Set Up a First Sensor Step by Step
A simple setup should feel repeatable. Use the same process whether the first device is a leak sensor, door sensor, motion sensor, or temperature sensor.
- Name the job. Write one sentence such as alert me if water appears under the sink or turn on the hall lamp after dark.
- Read the placement section. Check whether the sensor is indoor only, battery powered, waterproof, water resistant, or meant to be kept dry.
- Pair it near the router first. Add the device to the app before placing it in a hidden corner, basement, garage, or cabinet.
- Test the trigger. Open the door, walk past the sensor, place a damp paper towel near the leak contacts, or change the temperature reading if the manual suggests a test method.
- Set one useful alert. Avoid building five automations on day one. Start with the alert or routine that solves the original problem.
- Review after a week. If alerts are noisy, delayed, or ignored, adjust placement or timing before adding more sensors.
Test from the real spot
A sensor that works on the kitchen counter may behave differently inside a metal cabinet, behind a thick appliance, or far from the router. Test it from the exact spot where it will live.
Think about the person receiving the alert
An alert is only useful if the right person understands it. Use plain names like laundry leak sensor, back door left open, or basement humidity instead of model numbers.
Pros and Cons of Starting With Smart Home Sensors
Small starting point
One sensor can solve one clear problem without requiring a full smart-home rebuild.
Earlier awareness
Leak, temperature, humidity, and door alerts can help you notice changes before they become bigger annoyances.
Useful routines
Motion and contact sensors can support simple lighting and reminder routines when they are placed carefully.
Notifications can get noisy
Poor placement or too many alerts can make the setup feel more stressful instead of calmer.
Compatibility takes checking
Some sensors need a hub, a specific app, or a compatible smart-home standard before they work as expected.
Common Sensor Mistakes to Avoid
The most common mistakes are not dramatic. They are small setup choices that make the sensor less useful.
- Buying a bundle too early: test one or two devices before committing to a full ecosystem.
- Ignoring battery maintenance: add a quarterly reminder to check battery status in the app.
- Putting motion sensors in busy zones: pets, sunlight, fans, and traffic patterns can create annoying triggers.
- Using vague names: clear device names make alerts easier to trust.
- Skipping the manual: placement limits, temperature ranges, and water exposure rules vary by product.
- Treating alerts as guarantees: sensors are helpful aids, not replacements for maintenance, alarms, or professional inspection.
A Simple Checklist
Use this checklist before you call the first setup finished.
- One job chosen: the sensor has a clear purpose.
- Manual checked: placement, battery, and indoor/outdoor limits are understood.
- Real location tested: the sensor works from the spot where it will stay.
- Alert wording is clear: the notification says what happened and where.
- Review date set: you will adjust alerts after one normal week.
When to Get Extra Help
Get extra help if the project involves wiring, a line-voltage device, an HVAC system, a security system, a smoke alarm, a carbon monoxide alarm, or equipment you cannot safely identify. Do not replace required safety devices with general smart-home sensors.
Also ask for help when an alert suggests a real problem, such as repeated water detection, unusual heat, electrical smell, damaged cords, or a device that feels hot. A sensor can point you toward a check, but it should not become a reason to ignore a physical warning sign.
Frequently Asked Questions
What smart home sensor should a beginner buy first?
Start with the sensor tied to the clearest problem. For many homes, that is a leak sensor under a sink, a door sensor for a frequently forgotten entry, or a motion sensor for one low-risk light routine.
How often should I review smart home sensors?
Review alerts after the first week, then check battery status and placement about once per season. Also review after router changes, app updates, or room layout changes.
What should I do if I am not sure a sensor is compatible?
Check the product page and manual for the required app, hub, wireless standard, and power source before buying. If the sensor controls HVAC, wiring, or safety equipment, ask a qualified professional.
Can I undo a sensor routine later?
Usually, yes. Most app alerts and automations can be disabled or edited. Keep the original device name and placement note so you can troubleshoot without guessing.
Final Thoughts
Smart home sensors for beginners work best when they stay simple. Pick one real problem, choose the sensor that notices that condition, test it from the real location, and keep the alert plain enough for anyone in the home to understand.
A calmer smart home is not the one with the most sensors. It is the one where each device has a job, a sensible alert, and a routine you can maintain after the excitement of setup is gone.